Want to make delicious artisanal, no-knead bread at home? Use this fast, easy, and very forgiving three-step recipe to make some of the best bread you have ever tasted. You’ll be amazed.

Easy and Delicious No-Knead Homemade Bread
The inspiration comes from Mark Bittman’s “The Minimalist” NY Times column, where he suggested even an 8-year could make it! (Although it requires a 450 degree oven, so adult supervision is required!)
The original recipe took about 20 hours of wait time. This recipe is for his “speedy” no-knead bread that you can make in about 20 minutes or prep and cleanup time, with about 5 hours of wait time.
The Recipe: Easy Homemade No-Knead Bread

Recipe: Artisanal No-Knead Bread. Easy to make with only 4 ingredients!
Only 4 ingredients — plus water!
- 3 cups bread flour (or all-purpose flour also works fine)
- 1/4 teaspoon yeast
- 1/4 teaspoon red wine vinegar
- 1 1/2 teaspoons salt
- 1 1/2 cups very warm water (almost but not quite hot)
Note that I usually make a double batch with great results. Just double the ingredients and you get twice the bread ![]()
Instructions for No-Knead Bread
(20 minutes prep & cleanup, 5 1/2 hours wait time)
Step 1: make the dough (10 minutes prep, 4 hours wait)

No-knead bread: Mix a wet dough.
- Combine the dry ingredients (flour, yeast, salt) in a bowl.
- Add the vinegar to the water
- Add the water to the bowl, mixing it in with a large spoon (or any convenient tool) as you go. You need only stir until all the flour is wet and you are left with a wet, sticky, shaggy dough. You may need a little less or a little more water to get all the flour wet and shaggy.
- Cover the bowl with plastic wrap and let stand at room temperature for about 4 hours. The timing need not be exact.
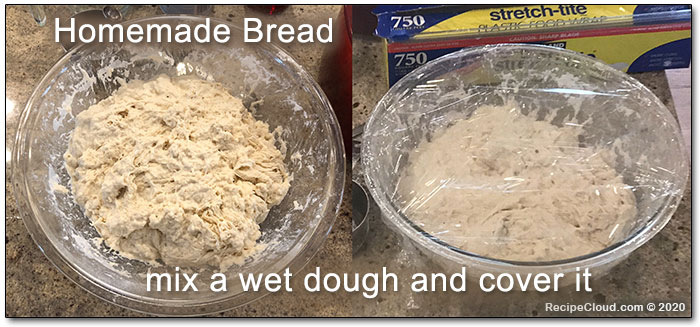
Easy Homemade Bread Step 1: Mix a wet dough and cover it.
Step 2: Heat the pot and very lightly work the dough (5 minutes prep, 30 minutes wait)

No-knead Bread Step 2: Fold over 3 – 4 times and cover.
After about 4 hours, your dough should have risen a bit and developed some bubbles. Now you are ready for step 2.
- Put your pot (with the lid on) in the oven and set it to 450 degrees
- Prep your large cutting board or any work surface with either a light dusting of flour OR a light coating of oil — just enough so that the dough won’t stick to your work surface. (Don’t use both oil and four — just one or the other!)
- Dump the dough onto your work surface and fold it over onto itself 3 or 4 times. To do this, grab the dough on one side and pull it over across the dough to the other side. Repeat from various sides until you’ve done it 3 or 4 times.
- Leave the dough on your work surface and cover loosely with plastic wrap. (You can re-use the same wrap that was covering the bowl.)
PRO TIP: Coating your work surface with flour will leave a nice artisanal dusting on your finished bread. But oil also makes a beautiful loaf.
Step 3: Bake (5 minutes prep, 30 + 15 minutes wait)

No-knead Bread Step 3: Bake 30 minutes covered and 10-15 minutes uncovered.
- Remove the plastic wrap
- Fold the dough over on itself again 3 or 4 times. This will make the final seam on the top of your bread. But don’t worry about how it looks — anyway you fold will turn out fine!
- With oven mitts or similar, VERY carefully remove the pot from the oven and place it on a heat-safe surface such as your stove. Remove the lid and also place on a heat-safe surface. Remember they are both 450 degrees!
- Take the dough and place it in the pot, seam-side up. Again, be careful not to burn your hands, forearms or anything else on the pot.
- Put the lid on the pot and carefully return it to the oven.
- Let bake for 30 minutes and then remove the lid — use your oven mitts, because it’s hot!
- Bake for another 10-15 minutes with the lid off until bread darkens to a nice color.
- Remove pot from the oven. Carefully remove the bread from the pot and place it on a cooling rack.
- Gaze in justified wonder at your creation. You made this bread! And it will taste even better than it looks


Delicious no-knead bread on the cooling rack.
PRO TIP: Keep an eye on the bread for the last five minutes of baking as the timing my be slightly different for your oven. You want it to turn a nice darkish shade of brown, but not too dark or burnt. Thirteen minutes is the perfect timing for my oven — but even slightly darker at 15 minutes still makes fantastic tasting (and looking) bread.
Equipment Needed To Make This Artisanal Bread At Home
This is kitchen equipment you need to make this amazing bread. You probably already have it all…

Easy No-Knead Bread: ingredients and equipment
- heavy oven-safe pot with lid (see Equipment Tip below)
- plastic wrap
- large bowl
- measuring cup
- measuring spoons
- large wooden or similar spoon (for mixing)
- large cutting board or any flat work surface
Equipment Tips: What Pot To Use?
If you are missing anything, it’s likely the pot. Most any heavy pot with a lid will do.

The LeCreuset 31 is an ideal — but expensive! — pot for homemade bread. Really, any heavy pot with a lid will do just fine.
I use a Le Creuset 31 Oval, which is 6.75 quarts and works well for either a single or double-size batch of bread. But that’s an expensive pot. You can use any heavy enameled cast iron, regular cast iron, Pyrex, or ceramic pot as long as it comes with a lid and is oven-safe to 450 degrees Fahrenheit.
A 3 or 4 quart pot works well for a single batch of bread. If you have a 6 or 8 quart pot, you can use it for either a single or a double-size loaf.
I like using an oval-shaped pot, because it makes a slightly longer, narrower loaf. But a round pot also works very well.
Inspired by Mark Bittman’s “The Minimalist” NY Times Column
While still writing his “The Minimalist” column for the NY Times, Mark Bittman teamed up with Jim Lahey from the Sullivan Street Bakery to come up with this simple recipe that anyone can make at home in a regular oven. The brilliant innovation was using a heavy, preheated, covered pot to simulate a steam-injected oven. And to avoid kneading, Jim used a very wet dough and lots of wait time.
The technique prompted Mark to write, “… the only bad news is that you cannot put your 4-year-old to work producing bread for you. The method is complicated enough that you would need a very ambitious 8-year-old.”
Speedy No-Knead Homemade Bread
Mark’s original 2006 NY Times article brought wonderful homemade bread into kitchens everywhere. The one catch was that the original method required about 20 hours of time, so you had to get started the day before.
A few years later Mark reconnected with Jim Lahey to shorten the timeline. Jim cut the time to about 5 hours by using extremely warm water with a little red wine vinegar. This sped up the rising time without hurting the quality. That innovation is the source of this speedy no-knead bread recipe.
What do you think?
People have described this bread as “Miraculous,” “Incredible,” and even “life-changing.” It’s been an enormous hit with my own family and everyone I know that’s tried it.
Have you tried it yourself? What do you think? Any problems? Any tips to help make it even better? Let us know with a comment below.
